This guide explains how to install and set up Asset Records Capture (ARC). It is written for end users, admins, and IT/setup teams.
TABLE OF CONTENTS
- Before you begin
- What you need to install
- Cyber Security Setting Requirements
- System recommendations
- Recommended scanners
- Set up your computer and station
- Add a scanner
- Scan modes
- Advanced scanner settings
- Troubleshooting
- Support
Before you begin
Make sure you have:
A Windows computer
A supported web browser such as Chrome, Edge, Firefox, or Safari
A scanner connected to the computer and turned on
The scanner driver installed on the computer
Permission to install software on the computer, if required by your organization
You may need help from your IT team if your company limits software installation.
What you need to install
ARC needs two items to work with a scanner:
The scanner driver provided by your scanner's manufacturer.
The ARC scanning service (Dynamsoft) installation file: https://arc.aviationdatainsights.com/static/dynamsoft/19.4/setup.msi
Sign in to ARC https://arc.aviationdatainsights.com/login
If the scanning service is not installed, ARC will show a download prompt.
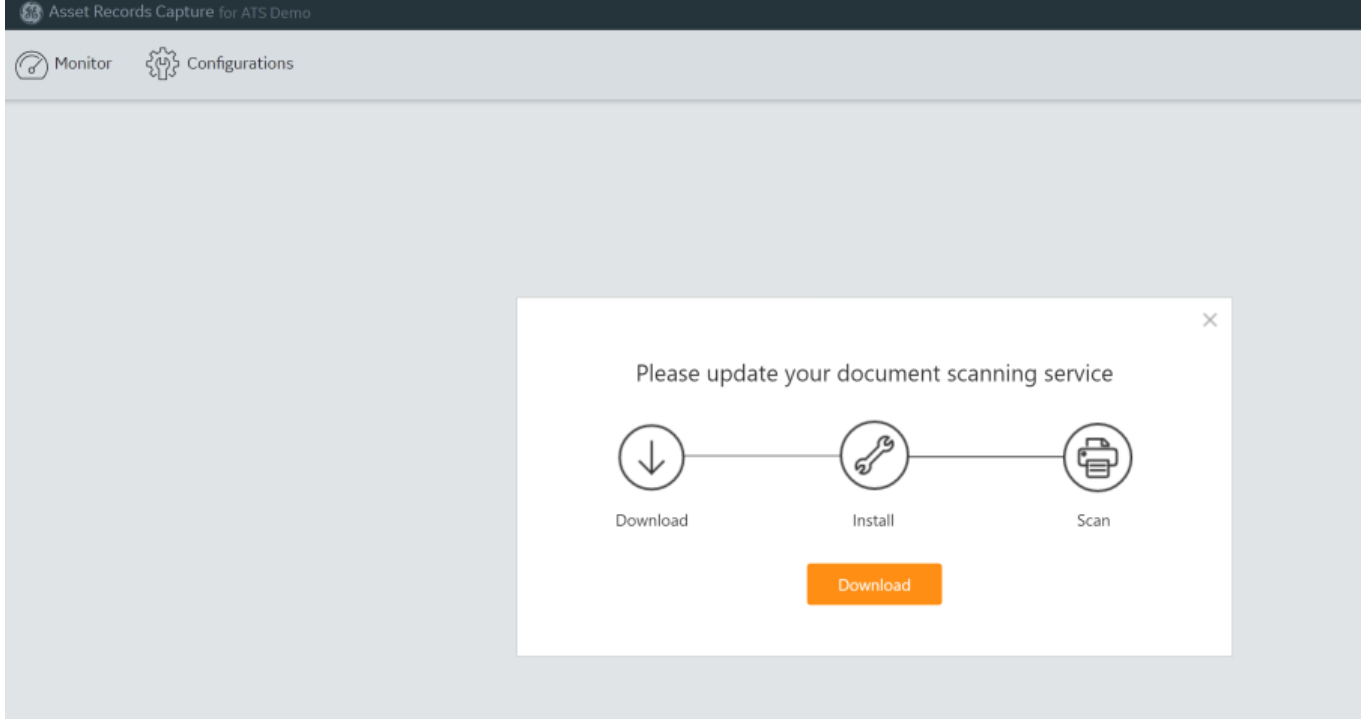
Download the installer.
Open the installation file.
Follow the setup steps on screen.
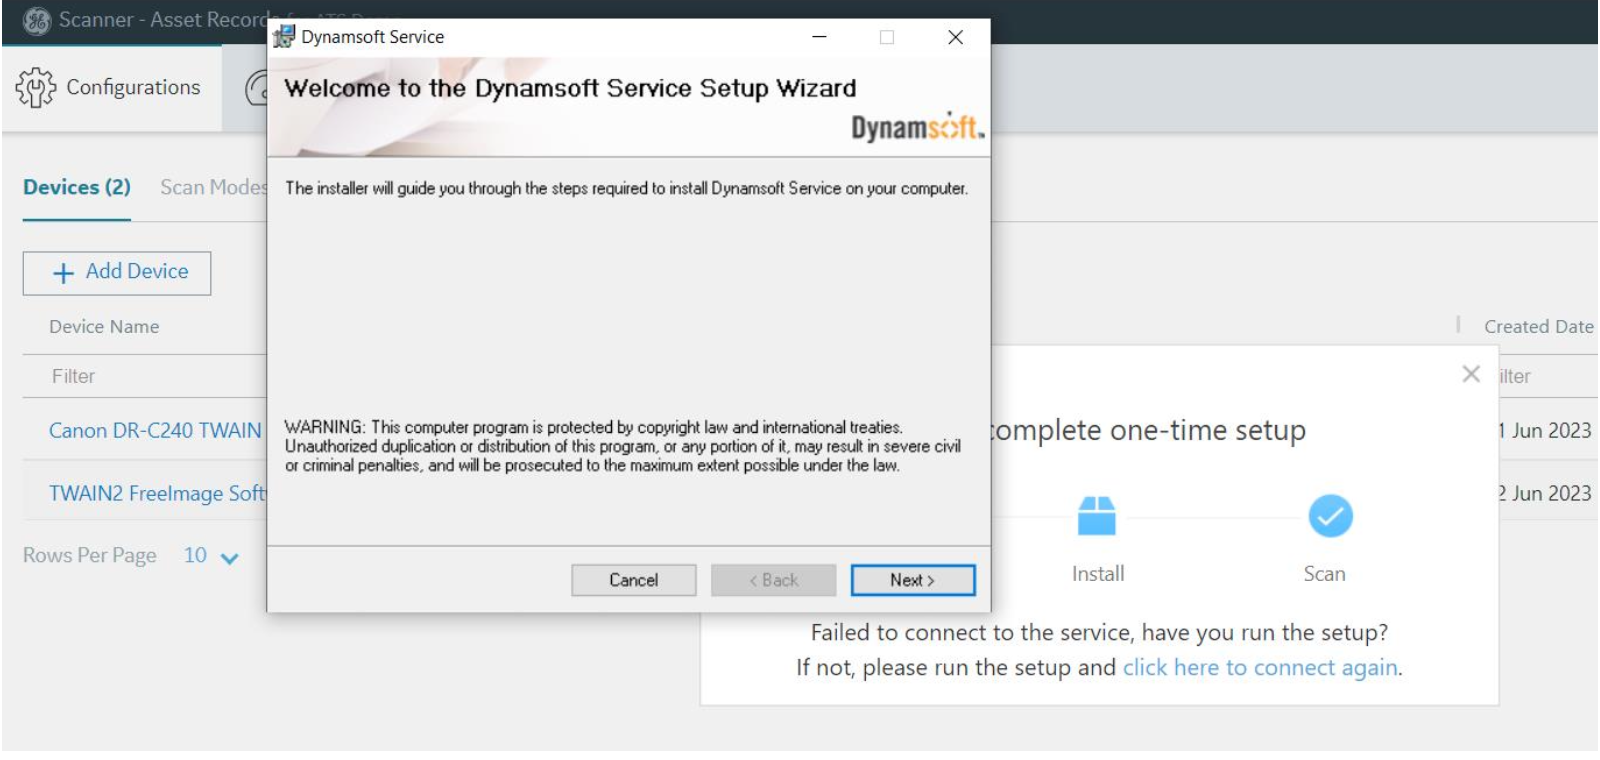
The install usually takes only a short time.
Cyber Security Setting Requirements
For better security, IT teams should block remote access to the Dynamsoft Administration Console. This helps prevent other computers on the same network from reaching scanner settings or scanned image access points.
This setup is recommended for Dynamsoft version 19 and later.
Block remote access to the Dynamsoft Administration Console
On Windows, follow these steps to create an inbound firewall rule:
Open the Windows search bar and search for Windows Defender Firewall with Advanced Security.
Open the tool and select Inbound Rules.
Click New Rule.
Choose one of these options:
Program if you want to block the Dynamsoft service by file path
Port if you want to block it by port number
If you choose Program, enter the path to the Dynamsoft service file. Example: C:\Program Files (x86)\Dynamsoft\Dynamic Web TWAIN Service 19x\DynamicWebTWAINService.exe
If you choose Port, enter the port used by the admin console and choose the correct protocol, such as TCP or UDP.
Select Block the connection.
Choose the profiles where the rule should apply: Domain, Private, and Public. Select all if you want the rule to apply everywhere.
Name the rule something clear, such as Block Dynamsoft Admin Console Access, then finish the setup.
Check that the new rule is enabled.
Test the setup from another computer on the same network. The admin console should not be reachable remotely.
If you are unsure how to do this, ask your IT or cybersecurity team to set it up.
The Dynamsoft file path may be slightly different depending on the version installed.
System recommendations
GE Aerospace recommends using the latest version of Features of TWAIN, from the TWAIN organization, at least TWAIN version 2.5 or latest. More details can be found in this link: https://twain.org/features/
Item | Minimum | Recommended |
|---|---|---|
Processor | 2.5 GHz or higher | 3 GHz |
Memory | 4 GB RAM | 8 GB RAM |
Operating system | Windows 7 | Windows 10 or later |
Browser | Chrome, Edge, Firefox, or Safari | Chrome is recommended |
Monitor | 1024 x 768 | 1440 x 900 or higher |
Scanner support | TWAIN 1.8+ | TWAIN 1.8+ |
Internet | 1 Mbps down / 1 Mbps up | 5 Mbps down / 5 Mbps up |
Recommended scanners
These scanner models are commonly used with ARC:
KODAK S2000
Canon DR-G2140
Canon DR-C240
Fujitsu fi-7150
Canon DR-G1100
Panasonic KV-N1058 / KV-N1028
Canon DR-M200
Panasonic KV-S2087
Canon P-215II
Fujitsu fi-7180
Other TWAIN-compatible scanners may also work.
Set up your computer and station
The first time you sign in, ARC may ask you to connect your computer to a station.
ARC uses a few simple setup terms:
Station: A named location for scanning, such as JFK
Computer: The name of the computer being used
Client key: A unique value created during Dynamsoft setup to identify the computer
Location: Optional details such as building, floor, or department
To complete setup:
Open ARC and sign in.
Select an existing station to connect or create a new one.
Type the computer name.
Add a location if needed.
Save your changes.
Add a scanner
Go to Configuration > Scanners tab.
Click Add Scanner.
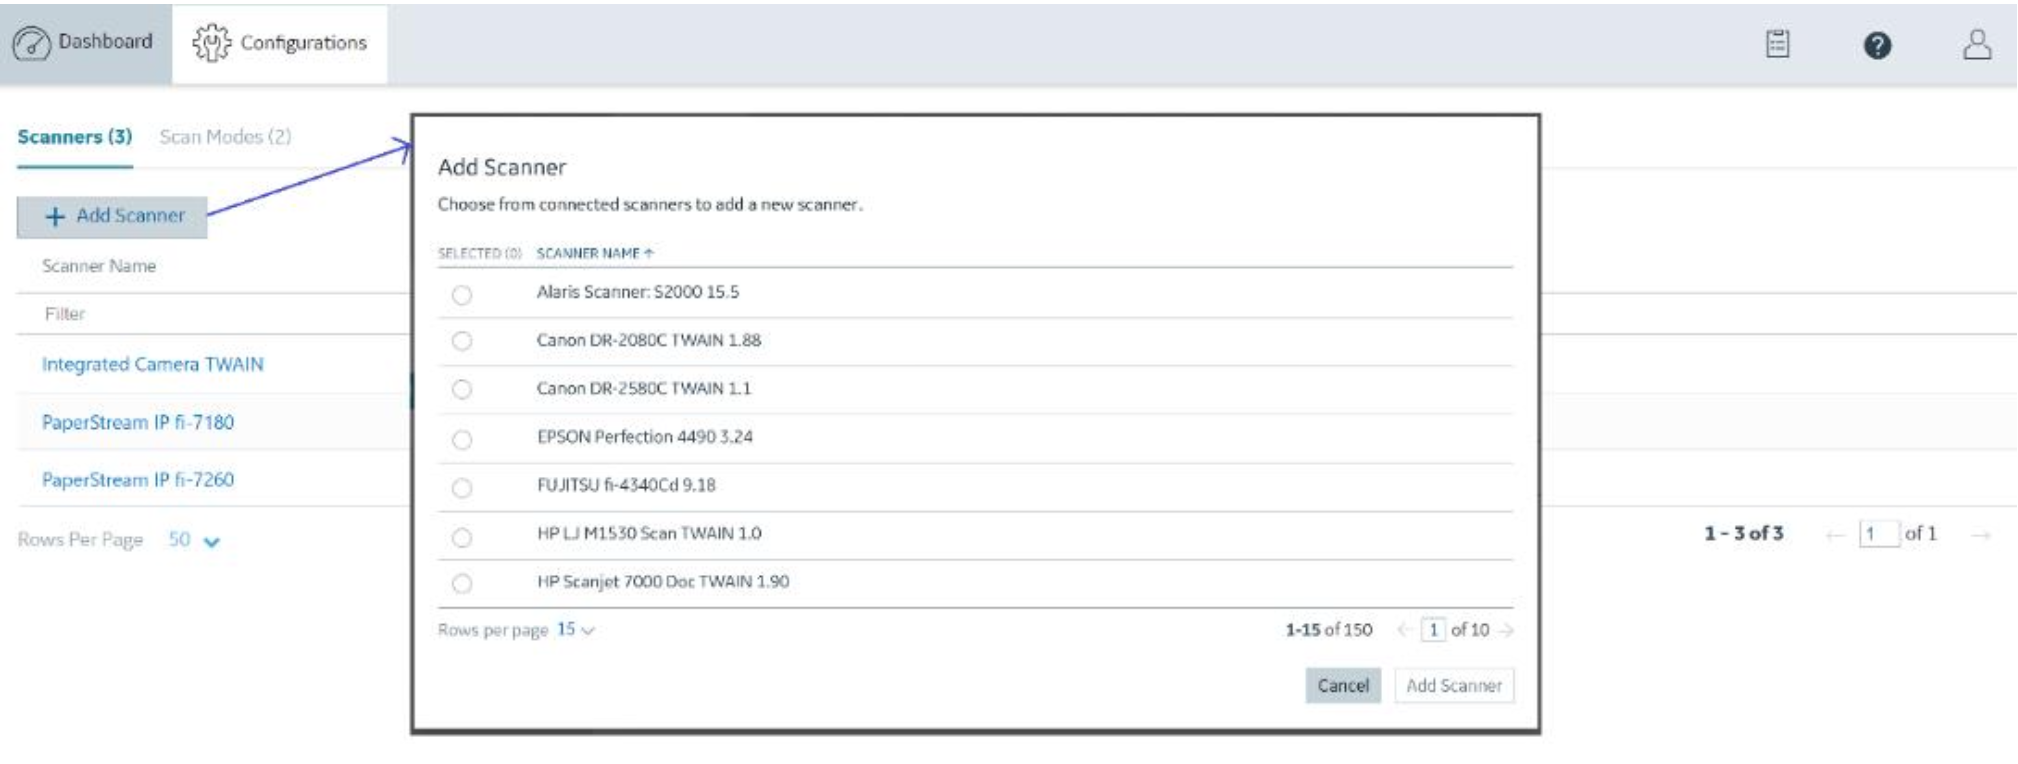
Select a scanner from the list of connected devices.
Make sure the scanner is turned on before selecting it.
Make sure your computer is physically connected to the scanner.
After you add the scanner, please associate it to the scan modes you prefer.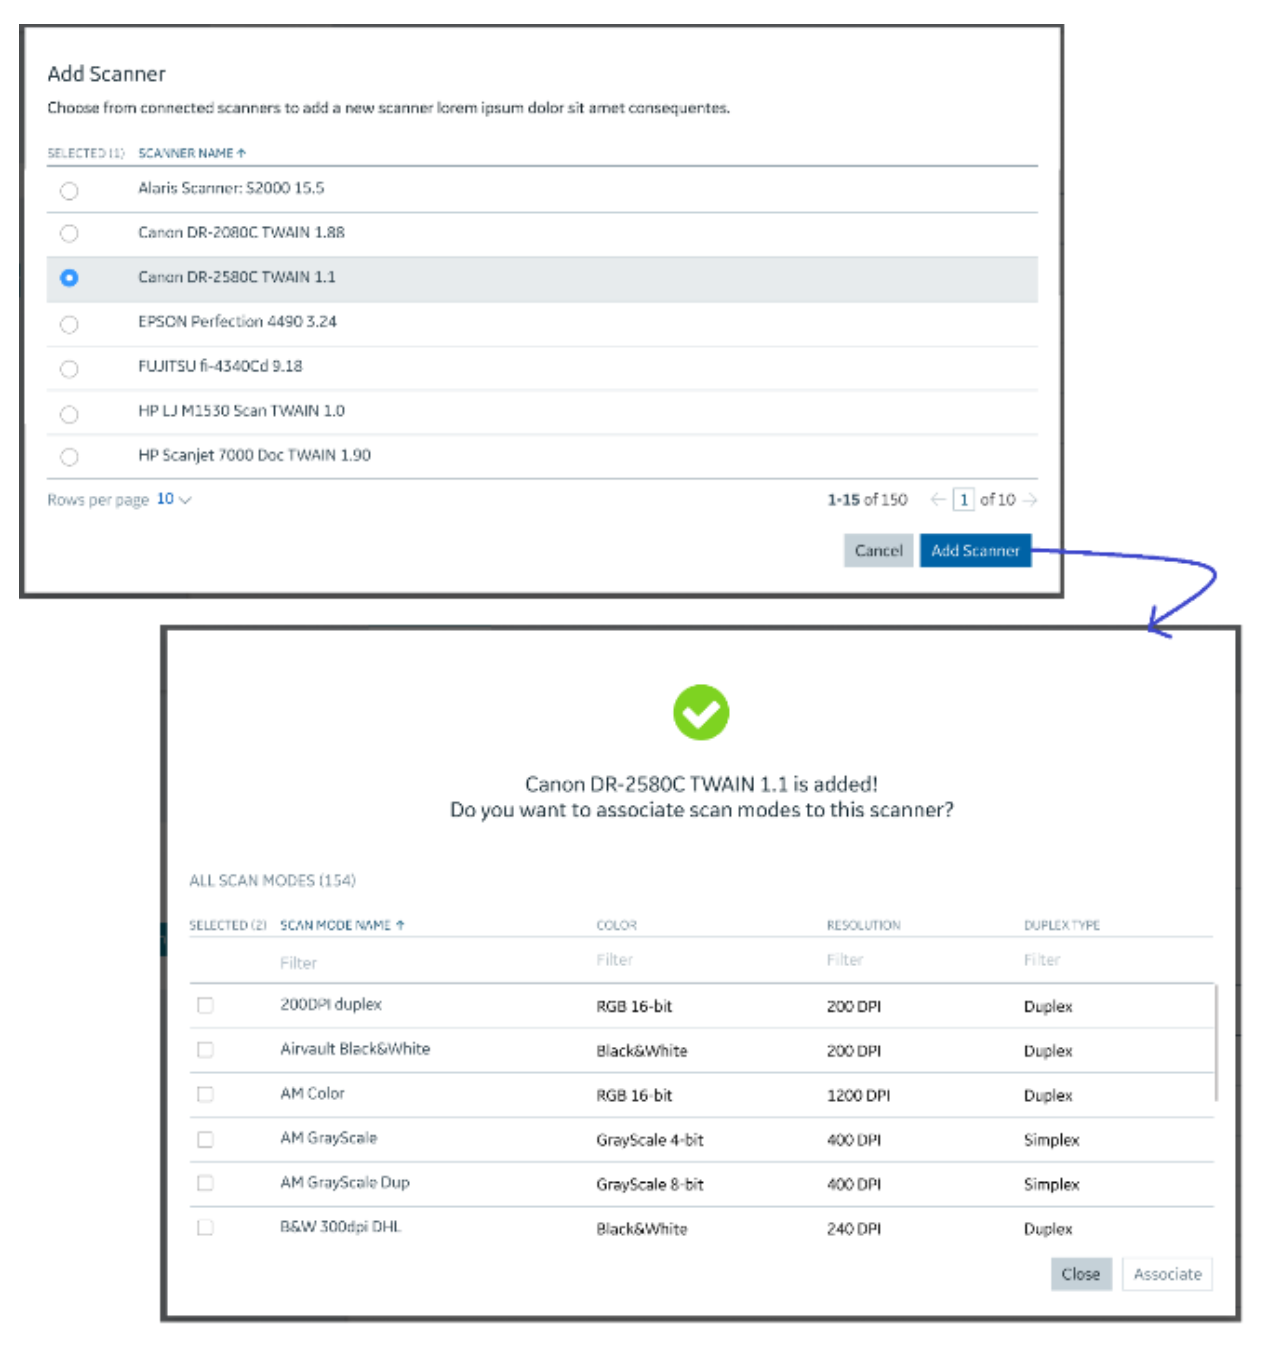
Scan modes
Scan modes control how documents are scanned, their resolution, color mode, and many other details.
Account admins and end users can assign scan modes to scanners.
Creating and changing scan modes are limited to GE Aerospace support team. If your organization needs a new scan mode, please work with our support team to have it created for your organization.
Advanced scanner settings
Advanced settings let admins adjust scanner behavior for a specific scanner model. For example, they can change:
Single-sided or double-sided scanning
Blank page detection
Brightness
Contrast
To update advanced settings:
Login to ARC and go to Configuration.
Click to Scan Modes tab.
Click to the scan mode you would like to modify.
Click Advanced Configuration.
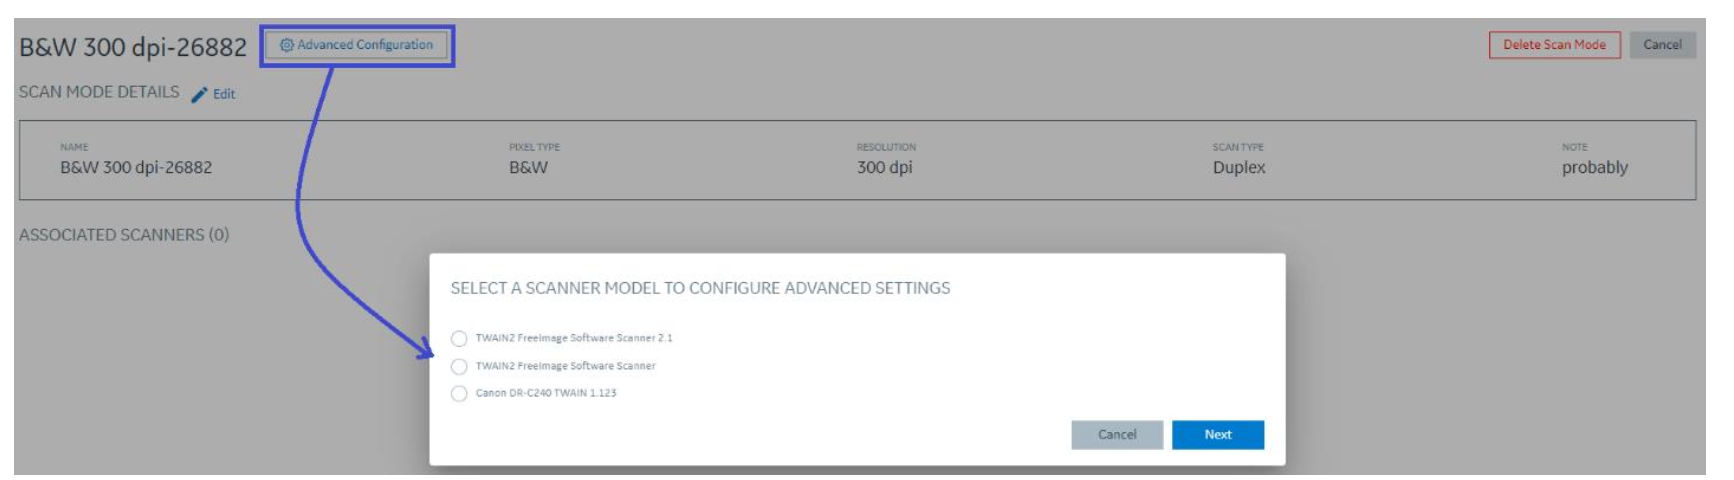
Select the scanner model.
Change the settings you need and click Save.
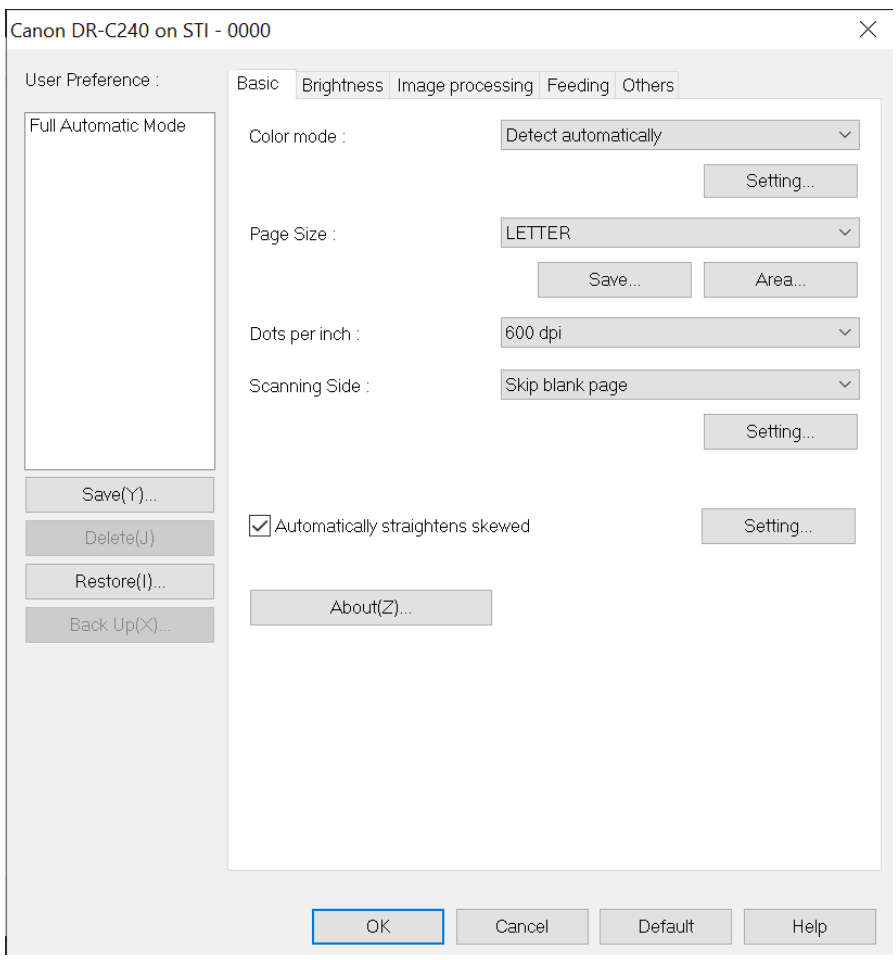
Access to this area may be limited to host admins or enabled by request for account admins.
Troubleshooting
If ARC does not detect the scanner, confirm the scanner is turned on, the scanner driver is installed and the scanner is connected the computer.
If the download prompt appears again, check that the scanning service finished installing.
If installation fails, contact your IT team to confirm you have permission to install software.
If scanner settings do not behave as expected, review the selected scan mode and advanced settings.
Support
If you need help, choose one of these options:
Create a support ticket: https://support.criticaltech.com/support/tickets/new
Email the Asset Records support team: asset.records@saas.geaerospace.com
Was this article helpful?
That’s Great!
Thank you for your feedback
Sorry! We couldn't be helpful
Thank you for your feedback
Feedback sent
We appreciate your effort and will try to fix the article